
Manual control of a spaceship is a key element in many games that use orbital mechanics. The objective is to allow the player to adjust the 3D velocity of a ship and see the resulting change in the orbit of the ship. Often these velocity changes are best done at a specific future point of the current orbit.
Gravity Engine provides several example implementations of this mechanic in the scenes found in the Scenes/MiniGames/Scenes/InOrbit-Manual folder. These scenes are show how the user input can interact with Gravity Engine to adjust the orbital motion. An example of it’s operation can be seen in the video:
This video also provides a discussion of some of the implementation details.
The use of manual maneuvers is often central to space games and the goal of this web tutorial is to explain the operation of these scenes in detail to provide a jumping-off point for customization in your own project.
We begin with the simpler of the demonstration scenes: ManualShipControl. Our objective is to highlight the key parts of the implementation and highlight the interaction of the controller code with GravityEngine and the OrbitPredictor components to produce the desired experience.
Manual Ship Control
The ManualShipControl scene demonstrates how user input can be used to change the orbit of the ship at the current position. The key class in the scene is the ManualShipControl script attached to the ship. The ship also has an OrbitPredictor attached and the control script uses this to show the result of the change in the velocity.
The ship is controlled by first pressing the M (maneuver) key. This displays a set of axes. Mouse input near the end of an axis selects velocity change along that axis. As the mouse is dragged the ship velocity vector change is displayed and the resulting change in the orbit is shown. After a series of these axes adjustments the maneuver can be performed by pressing the X (execute) key.
The ManualShipControl is implemented as a simple state machine with the states:
- IDLE: the ship moves under GE control. The user can requests a maneuver at the current ship position by pressing M. This moves the scene to AXIS_DISPLAYED
- AXIS_DISPLAYED: a set of three axes are shown, with clickable cones at the end of each co-ordinate axis. The user can click on a cone and hold the mouse button to select an axis. Pressing X executes the maneuver, changing the ship velocity and returning to IDLE.
- AXIS_SELECTED: drag to change the velocity along the associated axis. As the velocity is changed the resulting orbit is displayed. When the mouse is released the scene returns to AXIS_DISPLAYED with the new velocity maintained.
The controller interactions with Gravity Engine are through a small number of API calls:
- ge.SetEvolve() is used to pause/resume the scene
- ge.GetVelocityDoubleV3(shipNbody) is used to get the current ship velocity
- orbitPredictor.SetVelocity(shipVelocity.ToVector3() + impulse) is used to update the velocity in the OrbitPredictor to show the result of the user-specified velocity change
- ge.ApplyImpulse(shipNbody, impulse) applies the velocity change when execute is pressed
Inspector Interface
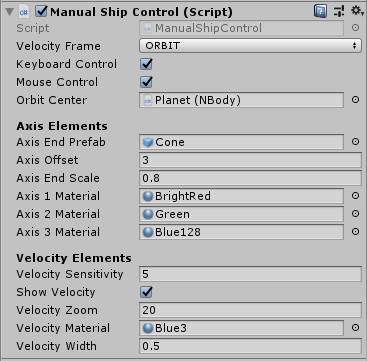
The fields are:
- Velocity Frame: determines how the axes displayed will be aligned with respect to the ship and center body. The alignment can be with respect to the scene, the ship or the current orbital position.
- Keyboard Control: Enable checking for key controls. M to start a maneuver, X to execute.
- Mouse Control: Enable direct checking for mouse inputs to control velocity adjustments. When disabled another controller can request mouse processing via HandleMouseInput()
- Axis End Prefab: A game object prefab that indicates the end of an axis. This object will be rotated so it’s Vector3.forward points along the axis.
- Axis End Scale: scale of the axis end object
- Axis [1-3] Material: Material to be used for each axis
- Show Velocity: Show the current change to the velocity vector
- Velocity Zoom: Factor by which to multiply physics velocity before rendering in screen.
- Velocity Material: Material used for the velocity line
- Velocity Width: Width of the velocity line
AXIS_DISPLAYED Implementation Details
The ManualShipControl component supports three different choices of co-ordinate axes for adjusting velocity:
- WORLD: Unity’s X, Y , Z reference frame
- BODY: The X, Y, Z frame rotated by the transform rotation of the body
- ORBIT: A frame that has an axis to the center of the orbit, perpendicular to the orbit and a third vector perpendicular to the other axes. NOTE: For non-circular orbits, this mean the “prograde”-like vector is not pointing in the direction of the current velocity, since it is kept at ninty degrees to the radius vector. This keeps the three axes independent.
The determination of the ORBIT frame requires retrieving some information from GE and doing a bit of vector math inside the SetAxes() method:
case Frame.ORBIT:
    Vector3 vel = ge.GetVelocity(shipNbody);
    axes[0] = Vector3.Normalize(shipNbody.transform.position - orbitCenter.transform.position);
    // axes[2] is normal to the orbit plane
    axes[2] = Vector3.Normalize(Vector3.Cross(axes[0], Vector3.Normalize(shipNbody.vel)));
    axes[1] = Vector3.Normalize(Vector3.Cross(axes[0], axes[2]));
    break;
All that is required is the normalized direction, so in this case it is fine to use the transform positions of the ship and orbit center instead of getting the GE internal information for these values.
Once these axes have been initialized, code in the method ShowAxisEndPoints() uses them to instantiate (if required) and position the game objects that have been designated as axis end points. Code in SetAxisTransforms() rotates the axis end objects to align them with the axis directions.
When the player clicks the mouse, the scene does a raycast and hit detection on the axis end objects (in the AXIS_DISPLAYED case in HandleMouseInput). If an axis end has been selected the state AXIS_SELECTED is activated and the code for that state determines velocity changes for the ship.
AXIS_SELECTED Implementation Details
As the user holds down the mouse button the mouse position information is used to determine a velocity change for the ship. The code for this is found in UpdateVelocityUI(). Before we look at that in more detail it is useful to first discuss the details of how to choose an appropriate scale for velocity changes. The use of a hard-coded velocity change scale causes issues since the specific ship velocity in the scene will depend on the radius of the orbit and the mass of the central body. A better approach is to normalize the user input velocity change to the current velocity at the position in the orbit. A second consideration is the need to allow small changes for precision adjustments and larger changes to attain very different orbits. The implementation in ManualShipControl takes these into account.
The base velocity scale is computed in the ComputeVelocityScale() method. This uses a few facts about orbits to set a scale: the escape velocity for a mass is Sqrt(2) times the circular orbit velocity at a given radius. In order to allow some velocity beyond this the velocity scale is set to 1.5 * v_circular. Computing the scale in this manner allows the code to be independent of the units used and the central mass value and radius.
The velocity change in the controller consists of two parts: the change due to the current mouse click (velocityChange) and the sum of any previous clicks to adjust the velocity (shipManeuverVelocityNet). When the mouse button is released the value in velocityChange is added to shipManeuverVelocityNet and velocityChange is cleared. This happens when the AXIS_SELECTED state exits.
As the mouse is held down, the mouse position is mapped to the screen. The ship position and the selected axis end point are also mapped to the screen and the mouse position with respect to the ship is then projected onto this axis to get a relative velocity change on the selected axis. This is the direct amount of the user velocity change. In order to allow more sensitivity at small mouse and bigger movements for large mouse offsets an exponential function is used to scale the user input. The parameter mouseScale can be used to tune this in a scene. The code for this is:
private void UpdateVelocityUI(Vector3 mousePos) {
    // map axis to screen space
    Vector3 origin = sceneCamera.WorldToScreenPoint(shipNbody.transform.position);
    Vector3 axisEnd = sceneCamera.WorldToScreenPoint(axisEndPoints[axisEndSelected]);
    Vector3 screenAxis = Vector3.Normalize(axisEnd - origin);

    Vector3 mouseVec = mousePos - clickStartPosition;
    Debug.LogFormat("mouseVec={0} screenAxis={1}", mouseVec, screenAxis);
    float mouseScale = velocitySensitivity * Screen.height;

    Vector3 deltaV = Vector3.Project(mouseVec, screenAxis);
    float dVsign = Mathf.Sign(Vector3.Dot(mouseVec, screenAxis));
    // mouse scaled will typically vary from 0..1.5.
    float dVMouseScaled = Mathf.Exp(deltaV.magnitude/mouseScale)-1.0f;

    Vector3 axis3d = axisEndPoints[axisEndSelected]  - ge.GetPhysicsPosition(shipNbody);
    velocityChange = dVsign * v_scale * dVMouseScaled * axis3d.normalized;
    Debug.LogFormat("dVsign={0} v_scale={1} dvm={2} vChange={3} smvn={4}",
            dVsign, v_scale, dVMouseScaled, velocityChange, shipManeuverVelocityNet);
    UpdateScreenLines();
}
As the velocity is changed UpdateScreenLines() changes a velocity arrow in the scene to give visual feedback. The state code in the controller calls UpdateOrbit() to use the current values of velocityChange and shipManeuverVelocityNet to update the orbit predictor allowing the path due to the new velocity to be visualized.
When the user presses X to execute the velocity change, the ship velocity is changed via:
    Vector3 impulse =  velocityChange+shipManeuverVelocityNet;
    ge.ApplyImpulse(shipNbody, impulse);
This completes the manual maneuver.
Maneuver at a Future Point
The scene ManualControlAtOrbitPoint extends the use of the ManualShipControl script to the case where the desired manual maneuver is at a future point in the orbit. The future point is controlled by the OrbitPoint component. This allows a point on predicted orbit to be placed under user control. See <link orbit point>
<video>
The co-ordination of user input to designate a future point in the orbit and the control of a manual maneuver at that fixed point is accomplished with the ManualSceneController. This collects user input and then delegates to OrbitPoint or ManualShipControl as appropriate. This requires that the ManualShipControl be configured with keyboardControl and mouseControl false to inhibit these being called in the Update() method of ManualShipControl. Instead the ManualSceneControl script calls them as required.
The choice of orbit point type can be changed based on user input:
- A – set orbit point at apoapsis
- P – set orbit point at periapsis
- U – user controller orbit point (use PHASE_FROM_MOUSE in OrbitPoint)
The scene controller makes use of a second NBody object with orbit predictor: SpaceshipAtOrbitPoint. This game object is initially inactive in the scene and is activated when the M key is pressed to begin a maneuver. The location of this ship is controlled by the OrbitPoint component. The velocity change is handledby the ManualShipController as described above.
The primary difference in the remote point manual control scenario is the fact that the change in velocity will occur at a future point in the orbit. The mechanism for implementing this in GE is a Maneuver() object.
Manuever Object
A maneuver object defines a change to an NBody object at a specific (future) time. The change can be one of three types:
- scalar: change along the current velocity vector
- vector: add the velocity change to the current velocity
- setv: set the object to the velocity specified in the maneuver
In this case we make use of the vector type of Maneuver.
The code in the controller gets a maneuver and adds it to GE:
                Maneuver maneuver = shipControl.CreateManeuver(spaceship, orbitPoint.GetOrbit());
                maneuver.onExecuted = ManeuverExecuted;
                ge.AddManeuver(maneuver);
The more complex task of creating the maneuver is implementd in ManualShipControl’s CreateManeuver(). The key detail in it’s implementation is determining the correct time at which the maneuver occurs. This requires that the code determine how long it will take the ship to reach the OrbitPoint the user has specified. This is accomplished with the OrbitUniversal TimeOfFlight() method as show below:
    public Maneuver CreateManeuver(NBody fromNbody, OrbitUniversal orbitU) {
         Vector3d shipPos = ge.GetPositionDoubleV3(shipNbody);
         double tof = orbitU.TimeOfFlight( ge.GetPositionDoubleV3(fromNbody), shipPos);// create a maneuver that add dV to existing velocity
         Maneuver maneuver = new Maneuver();
         maneuver.mtype = Maneuver.Mtype.vector;
         maneuver.worldTime = (float)(ge.GetGETime() + tof);
         maneuver.velChange = shipManeuverVelocityNet + velocityChange;
         maneuver.nbody = fromNbody;
         return maneuver;
}
With the maneuver added to GE, the scene can resume and the engine will trigger the velocity change at the appropriate time.
User Input Control
The key controls M (maneuver) and X (execute) are handled by the ManualSceneController in this case. As a result the Keyboard Control setting on the ManeuverShip component is disabled. The mouse control on the ManeuverShip is also disabled. Mouse events are handled by the ship controller. Mouse events are first passed to the ManeuverShip component and if they are not responded to there then they are passed to the OrbitPoint.