
Unity 4.6 provides a fantastic new UI framework. I will never use the old OnGui() again! I have been using the new framework for the past several months while Unity 4.6 was in beta. During this time I have collected a few tidbits on working with the framework.
Getting Started
The tutorials are very good and the information in the manual is getting better all the time. I found the tutorials on Canvas, RectTransform, Button and Event System a bare minimum to get the idea of the whole thing.
Adapting for Mobile Screen Sizes
This was one of my first “care-abouts”. There are two things that are important to know. The first is the anchor system for the layout of elements (see the RectTransform tutorial) but that is only part of the solution. The crucial other element is adding a CanvasScaler to your root canvas.
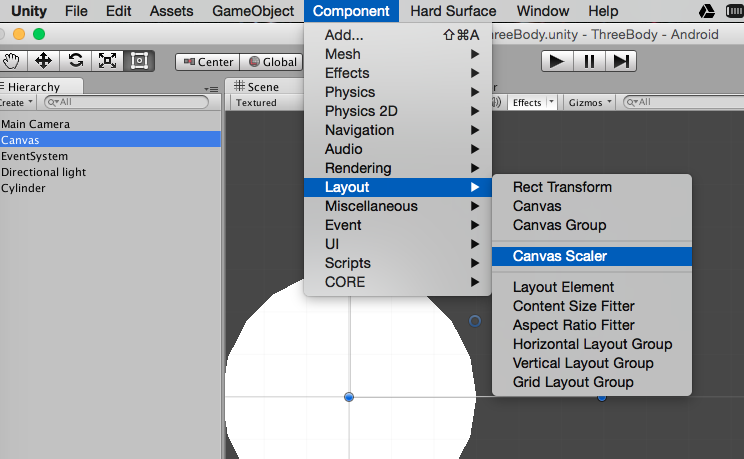
Once attached to a Canvas this can then be set to give a reference size and you’re good to go. As the device screen size change your UI element will scale appropriately.
UI interactions with Scripts
In the C# world the Unity elements can be created and modified as you would expect. You will want one or both of the following includes:
using UnityEngine.UI;
using UnityEngine.EventSystems;
ColorBlock: Changing Button Colors
The ThreeBody game I am creating makes use of collections of buttons as radio boxes. I set the disabled and highlighted colors to reflect the color I want for unselected and selected. When it is time to enable a button, then the normal color of the button is set to the value in the highlighted color. It would be reasonable to expect that:
button.colors.normalColor = Color.white; // DOES NOT WORK!
would work. It does not. Instead you need to make a temporary copy of the ColorBlock and then modify its elements and copy back the ColorBlock:
    // flip to highlighted color
    private void EnableButton(GameObject go) {
        Button b2 = go.GetComponent<Button>();
        ColorBlock cb2 = b2.colors;
        cb2.normalColor = cb2.highlightedColor;
        b2.colors = cb2;
    }
Touch Events and Buttons
Button touch events will still fall through into code that handles touches so it becomes important to screen out those touches that are over top of buttons. A technique that works for both mouse and touch events is:
    private bool IsTouchOnButton() {
        GameObject go = EventSystem.current.currentSelectedGameObject;
        if (go != null) {
            if ( go.GetComponent<Button>() != null) {
                return true;
            }
        }
        return false;
    }
Panel Fading and CanvasGroup
There is not a lot said about panels in the tutorials or online docs. These appear to be containers for holding a subset of the UI being developed. I found them useful for Settings Menus and High Score panes. In order to run a fade effect on these panels, you can add a CanvasGroup (which then has a field “alpha” that allows direct control over fading). An example of such a fade coroutine is:
    public GameObject menuPanel;
    private const float FADE_TIME = 0.5f;
    private const float FADE_STEPS = 10f;
    private const float FADE_INCR = FADE_TIME/FADE_STEPS;

    private IEnumerator FadeMenuPanel(bool visible) {
        CanvasGroup cg = menuPanel.GetComponent<CanvasGroup>();
        if (!visible) {
            for (float i=FADE_STEPS; i > 0; i--) {
                cg.alpha = i/FADE_STEPS;
                yield return new WaitForSeconds(FADE_INCR);
            }
            cg.alpha = 0.0f;
            menuPanel.SetActive(false);
        } else {
            menuPanel.SetActive(true);
            cg.alpha = 0f;
            for (float i = 0f; i <= FADE_STEPS; i++) {
                cg.alpha = i/FADE_STEPS;
                yield return new WaitForSeconds(FADE_INCR);
            }
            cg.alpha = 1.0f;
        }
    }
Note that in my case I also change the panel active status. This needs to be done at the end of the fade out or the start of the fade in for the object to stay visible during the fade.
Off-Topic: Trail Renderers
This is not part of the new Unity UI theme but as part of getting ThreeBody ready I had to learn a bit about TrailRenders. I use these to leave paths behind the “stars” in ThreeBody so the orbital paths can be seen. I always had weird issues with setting materials and colors until I finally found some clear advice on the forums about the material choice. I need to choose a particle material and the trails look best with a mobile/particle/vertex-lit shader on that material. To get solid colors I have created a simple 128×128 solid color PNG, imported as a texture.
Another tidbit is how to recycle objects once you have used trail generation. To get rid of the trail I ended up setting the trail length to -1, then counting 5 update cycles before setting the object inactive and putting it back into my object pool. I played around with coroutines for this but they ended up creating more complications – and a simple synchronous design won out.
Hope some of these save you some time.
[social4i size=”large” align=”float-right”]