Tutorial: Nested Orbits and KEPLER (“on-rails”) mode#
A solar system has a hierarchy of gravitational interactions. Planets orbit a star (or stars), moons orbit planets and so on. In general a gravitational system with three bodies does not have simple equations that describe the future motion of the bodies. In many cases the motion is chaotic and very small changes in the setup lead to very big differences in later motion. In some special cases, typically heavy stars and lighter other objects there can be quasi-stable motion (e.g. our solar system!).
In a space game we might wish to explore this chaotic aspect of gravity OR we may just want a clockwork system with planets and moons in prescribed orbits. GE2 allows both. This is done by the choice of the propagator for a body. A GRAVITY propagator will do full N-body numerical integration and the motion may well be unpredictable. A KEPLER propagator will evolve the motion in a prescribed orbital path around the body designated as it’s center. This may be a circle, ellipse or hyperbola depending on the initial orbit data. KEPLER mode is also sometimes referred to as “on-rails”. GE2 also allows a sequence of KEPLER motions to be patched together (patched-conics); this is described in patch mode.
If ALL bodies in a scene are using an “on-rails” style propagator (i.e. none are using N-body gravity) then it is possible to ‘jump’ the time forward and backward and calculate the position of all bodies in the scene.
Lets illustrate how to build a star/planet/moon system and look at the effect of Kepler mode and how to jump time back and forth with a simple slider.
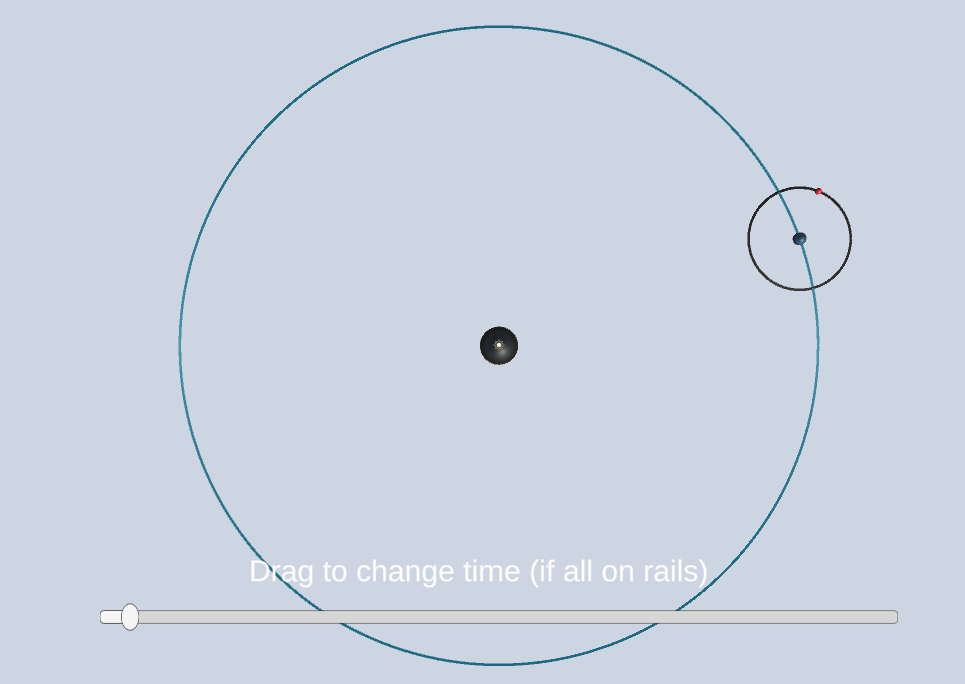
KeplerPlanetAndMoon#
To create the scene we begin with a hierarchy of
GSControllerandGSDisplayusing dimensionless units and default scale.We add a game object
Starand attach:
GSBodycomponent with mass 1000 and prop=FIXEDa
GSDisplayBodya child holding a sphere component of size 3
As a child of
Staradd a game objectPlanet
add a
GSBodywith mass=50, prop=Kepler and input=COE with a=25add a
GSDisplayBodyadd a
GSDisplayOrbitand ensure track attached GSBody is enabledadd a Line Renderer and fill in the Line Render slot in
GSDisplayOrbitwith a reference. Set LR width to 0.2add a child game object with a sphere of size 1
As a child of
Planetadd a game objectMoon
add a
GSBodywith mass=0.01, prop=Kepler and input=COE with a=4add a
GSDisplayBodyadd a
GSDisplayOrbitand ensure track attached GSBody is enabledadd a Line Renderer and fill in the Line Render slot in
GSDisplayOrbitwith a reference. Set LR width to 0.2add a child game object with a sphere of size 0.5
Drag the GE2Camera from Prefabs into the scene
fill in the
GSDisplayfield
At this point we can play the scene and see a moon orbiting a planet orbiting a star. KEPLER mode is keeping them all in clockwork motion. Of course, this is not the real gravitational motion. To see this set the propagators for the planet and the moon to GRAVITY and press play again. The moon starts to wander off.
On-Rails Time Slider#
Let’s set things back to KEPLER and add a slider to jump the time forward backward.
To do this we need to add a slider to the scene. We do this in the usual way adding a Canvas, EventSystem and the a Slider as a child.
Now let’s create a simple controller that will add a listener to the slider and react by setting the GE2 time to the raw value of the slider.
We’ll call this GETimeSlider. It will have public variables to get a reference to the Slider and the GSController.
In the startup we’ll just add a callback for slider value changes:
   void Start()
   {
       slider.onValueChanged.AddListener(TimeSlide);
   }
The callback itself will just record the new value and set a flag that will be checked in the Update() method.
   private void TimeSlide(float t)
   {
       time = t;
       setTime = true;
   }
In the update method for the class we do one of two things:
If there was a slider change, set a callback to change the GE time
Set a callback to update the slider value with the current GE time
   void Update()
   {
      if (setTime) {
          gsController.GECore().PhyLoopCompleteCallbackAdd(TimeSet);
          setTime = false;
      } else {
          gsController.GECore().PhyLoopCompleteCallbackAdd(TimeUpdate);
      }
   }
The extra layer of indirection with a GE physics loop complete callback is to allow for the GSController to run in job mode. A scene that uses only IMMEDIATE mode in the controller
could skip this. Now lets look at the callback functions and see the ‘real’ work happen.
To set the time in GE:
  private void TimeSet(GECore ge, object arg)
  {
        gsController.TimeWorldSet(time);
  }
Note that this sets the world time. If you look at the inspector for the GSController there is a Runtime information section that displays the
world time, GE time and game time. The choice of units and time scale is described in detail in scaling. In general when interacting with GE values will be
in world units for length, velocity, mass and time. The choice of world units is set in the GSController inspector.
If there has not been a slider change then the code updates the slider value with the current world time. This is done via:
  private void TimeUpdate(GECore ge, object arg)
  {
        slider.SetValueWithoutNotify((float)gsController.GECore().TimeWorld());
  }
We make use of the set without notify because we do not want a set to result in a slider value callback.
Now when the scene is played the slider will advance as time goes forward. Dragging the slider to the future or past updates the state of the GE2 objects so that their positions reflect the new time.